


Buy anything from 5,000+ international stores. One checkout price. No surprise fees. Join 2M+ shoppers on Desertcart.
Desertcart purchases this item on your behalf and handles shipping, customs, and support to India.
โก Elevate your 3D prints with precision power and durability!
The Bigtreetech Upgrade Dual Gear Extruder is a premium all-metal MK8 extruder kit designed for popular 3D printers like CR-10 and Ender series. Featuring dual gear extrusion for superior filament grip, CNC-machined aviation aluminum construction for long-lasting stability, and an adjustable spring tension system, it ensures smooth, high-speed filament feeding with minimal slipping. Ideal for professional makers seeking reliable upgrades that boost print quality and speed.


| Customer Reviews | 4.0 out of 5 stars 865 Reviews |
G**.
Stop Hesitating โ This is the Hotend the X1C Deserves
If you own a Bambu Lab X1C, you know the "Bambu struggle": dealing with those tiny, proprietary heater/thermistor clips and the chore of swapping out entire assemblies just to change a nozzle size. After cycling through several stock replacements and fiddling with finicky off-brand alternatives, I finally bit the bullet on the BIQU Panda Revo. Here is why itโs worth every penny. Installation: As Easy as it Gets One of my biggest concerns was a complicated teardown, but the installation was a total breeze. BIQU provides detailed, step-by-step instructions that are actually easy to follow. Itโs a direct fit for the X1C carriage, and because it utilizes the Revo ecosystem, you arenโt dealing with those microscopic wires that seem designed to break the moment you look at them. The "Revo" Advantage The real magic here is the Toolless Nozzle Swap. No more: Unplugging delicate JST connectors. Thermal paste messes. Wrangling the ceramic heater spring. You simply unscrew the nozzle with your fingers (once cold!) and pop a new one in. Whether youโre switching from a 0.4mm for a detail print to a 0.6mm for abrasive filaments, it takes seconds, not minutes. Is the Price Justified? Iโll be honest: I delayed this purchase for months because of the "sticker shock." However, looking back at my order history, I realized I had spent nearly the same amount on multiple replacement stock hotends and various "all-metal" clones that never quite performed right. Learn from my mistake: Don't let the upfront cost scare you. When you factor in the time saved and the durability of the Revo heater core, it pays for itself. Pros True Plug-and-Play: Designed specifically for the X1C ecosystem. Cold Swaps: Change nozzles by hand without tools. Reliability: Excellent thermal consistency and significantly fewer clogs than stock. Build Quality: It feels like a premium, professional-grade component. Cons Initial Cost: Higher entry price than standard replacements. Ecosystem Lock-in: You must use E3D Revo nozzles (though their quality is top-tier). Final Verdict The BIQU Panda Revo is a noteworthy upgrade that transforms the X1C from a great printer into a seamless production powerhouse. If you find yourself frequently switching between materials or just hate the maintenance of the stock assembly, stop buying replacements and just get this. It should have been my first purchase.
S**N
Works well
Has been working great for a few prints now using PLA on a Bambu X1C set at 30mm3/s max. So far only a couple hundred grams through it. Make sure to look up install and use instructions. It will 'work' plug n play, but you wont be getting any highflow out of it without setup. There is some weird wire routing behind the fan to do. Also, make sure to run printer calibration after install. I look forward to the quick change nozzle because swapping the stock system was a pain. I havent tested changing the nozzle since the install, but have some new nozzles coming in soon.
C**Y
Wont work for Ender 3 pro
Does not fit Ender 3 pro like stated. To line up with the filament the key for the gear on the shaft doesnโt make contact.
H**.
Overall, a great upgrade! Well worth the $$
Ordered this for my Ender 3 pro as the teeth were worn and no longer feeding the filament consistently. I have installed similar hardware on other printers, so this one wasn't a big deal, but for someone new to this, the lack of decent instructions may be a bit frustrating. The only other con for me is the inability to add an extruder knob due to the design. Not a deal breaker, but maybe future versions could allow for this. Now for the good: This thing is well built and works like a dream! Anyone that has dealt with the old style single gear extruders know how aggravating feeding new filament can be! Sometimes it seems almost impossible to get it aligned and feeding properly. No such issue with this one. Feeds right through, and no slipping or jumping. I'm also not seeing the filament dust accumulate around the drive gears like in others. Would definitely purchase again!
D**.
Absolutely kills it.
To get it out of the way first, yes, as everyone else has mentioned... No instructions. However, if you pay attention when you are removing your old extruder, this is a straightforward process. I have been trying in vain to get a large nozzle (1.0 mm) to work on my ender 3 pro for rapid drafting. The stock extruder laughed in my face and skipped like a record when I tried to print with the 1 mm. I installed this extruder, not really expecting that much of a difference, but I had tried every other suggestion for fixing extruder skipping. Slowed the print down, adjusted up my zed offset, changed stepper motors, checked stepper voltage, all that crap. Long story short, I installed this guy and have run a few tests. I started with a layer height of .6 at a print speed of 30. No problemo. I was surprised. So I jumped it up to the .8, same speed. No issues. I went bananas and jumped it up as far as I could possibly need it to go: 1 mm layer height at 50 mm/s (my usual speed for PETG). I'll note here that I ran it at a 1.1 layer width as well. Holy crap, it ran it no problem. You can watch your spool as the life drains out of it at that height and speed, but it does an amazing job now. Just from the extruder change. Buy it. Buy it now. BTW, you can do a layer height the same as the nozzle, but you need to know how to set your slicer. Most people recommend no more than 75 - 80 percent, and that's perfect if you don't want to muck around too much.
K**.
Great product, bad compatibility and advertising. Please read review before making a decision.
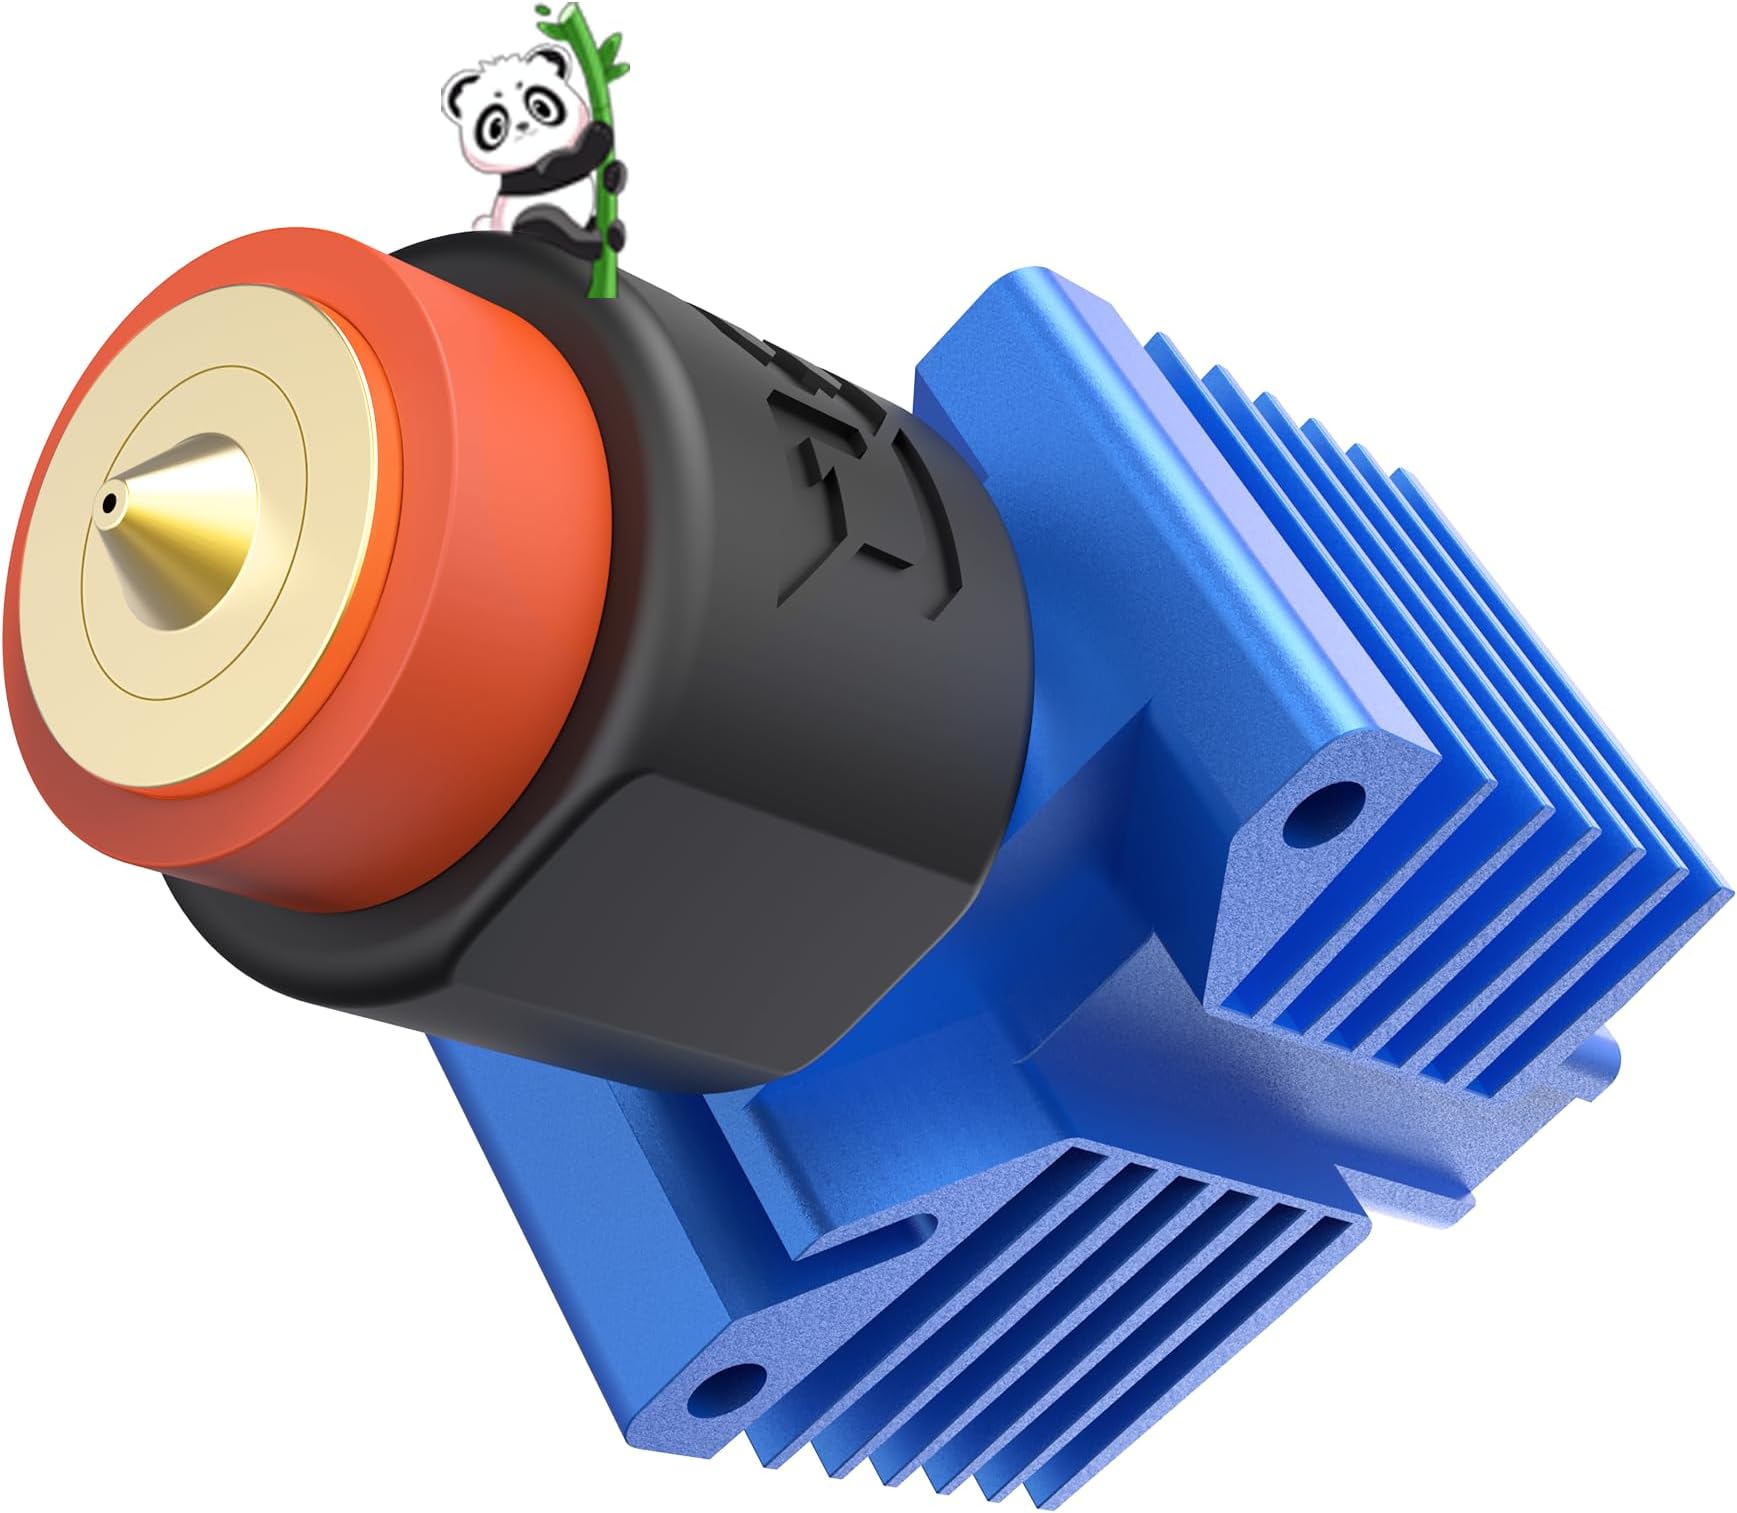
First let me say this hot end is one of the best on the market for its price range. Itโs every actual meaningful upgrade you can do to a hot end packaged into a ready to install product, no searching around for parts trying to peace things together with random Chinese products and waiting months for things to come from Ali express. But sadly I cannot recommend this product to MOST of the ender 3 market. Pros. Best hot end under 100 bucks imo, no mods to the hot end are needed. Think of it as a โfully upgradedโ e3d bi metal heat break, copper block, cart thermistor etc. Btw the built in Bowden tube connector is a feature not a con like some reviews said, it shortens the distance from the extruder to the hot end on direct drive. Beautiful construction, like stunning finish for a product in this price range it looks like it came from a custom CNC shop. Cons It is NOT bolt on compatible with most* ender 3 (and ender 3 compatibles) printers. This hot end is SIGNIFICANTLY shorter than the stock ones used in all the ender 3 off the shelf printers, as well as most aftermarket ones (itโs to date the shortest one I have ever used on an ender) the problem is this causes it to create severe clearance issues with bl touch, fan shrouds, fans, part cooler fans etc being too long for the print head to reach the bed. This can easily be worked around for people who are โmakersโ modifying the entire assembly around it (shortening abl sensor mounts, lifting fans, custom fan mounts, custom fan shrouds etc) max so to speak of course BUT this product is sold as a direct replacement, it is Not. Adding to this the heat block itself is quite long front to back, meaning Iโm almost all applications it interferes with the x carriage back plate and the sock is almost impossible to install without removing the hot end. Meaning a nozzle change requires you to 1 remove the whole fan shroud, 2 remove the hot end, 3 remove the sock and the nozzle, 5 reinstall the new nozzle and the sock, 6 reinstall the hot end, 7 reinstall the fan shroud. 7 step nozzle change on any ender printer if you use the sock. How convenient. Add onto this that the heat sink is not bolted to the heater block making it a huge risk of snapping the (proprietary) heat break. The fix for this is a set of longer screws and some washers to add clearance to the hot end from the carriage. Likely less than a cent worth of parts for the manufacture to include in the product DESIGNED to be compatible with the ender series printers. Now you have a new problem Your hot end fan will now have clearance issues. Again can be worked around but is just simply annoying for a upper end product in this industry being sold as compatible. Overall the problems with this product is that it does work and works amazingly, but itโs being sold as a compatible product for the ender 3 yet requires a complete overhaul of the x carriage accessories to make it work. This is fine if the product is sold this way but this is sold as a compatible product, a huge portion of the ender market is entry level users without any skill or knowledge about the printers, this advertising is just targeting them to sell them a product the do not need, and in many cases will not be able to use without spending significantly more money and time than is needed.
M**N
A great upgrade for my biqu b1 but needs some config changes and spacer
I have 4 BIQU B1s and installed these on 2 of them so far. I plan to do the other 2. These are a really solid upgrade. For the BIQU B1, you need to be aware of a couple things: - The esteps will need to be changed. Mine defaulted to 98 on the old factory extruder. (That resulted in 105mm instead of 100mm extruded by the way). The correct estep value for these is 136 for a BIQU B1. You can set this via gcode using "M92 E136" then issue a save with "M500". You can also use the "save to eeprom" in the BIQU B1 menu to save. If you're not comfortable entering console commands you can use the tuning menu in the BIQU B1 and do the calibration then ignore the measurements and just increase the esteps to 136. After that, make sure you use the "save to eeprom" option. - Some slicers add esteps to the gcode. The ideamaker app that comes with the BIQU B1 does this. So you'll have to edit the printer config and go to advanced and change it from 98 to 136. You can open the gcode files with notepad or such and search for M92 and make sure it's E136 not E98 in that file. - You can alternatively do none of the above and only change the value in the gcode from M92 E98 to M92 E136 but this requires editing each gcode file after saving it. - Finally, the printer's filament sensor will be slightly too low when installing the new extruder. Ideally you need a couple more 1/4" spacers and a couple longer M3 screws. What I did is unscrew the two screws on the filament sensor and move it to the left so that the right screw went into the left hole on the holding bracket. Then I just used the right screw to hold the sensor in place. This moved it to the left almost an inch and the filament can bend a little and it works with no other spacers. A better long term solution will be to get some longer M3 screws and print a couple extra spacers. But it's been working as I set it without any additional parts.
E**N
Fits BIQU B1
Fits biqu b1, but filament sensor does not work directly with it. What Iโm doing is just unscrewed the sensor and let it hang there and works just fine. Iโm getting 2 more. Need to adjust esteps for extruder. Mine is running right at 139 e steps per mm and I noticed it prints much better with 105% flow rate. I may go ahead and adjust the e steps to get the flow rate correct at 100%. Big upgrade, dual gear drive is so much better I would imagine than just the bearing with low grip on filament. Also, get some small tweezers and reverse each of the pins in the extruder drive motor plug, as if not, it will run backwards.
S**E
perfect
ottimo
Trustpilot
2 months ago
1 month ago